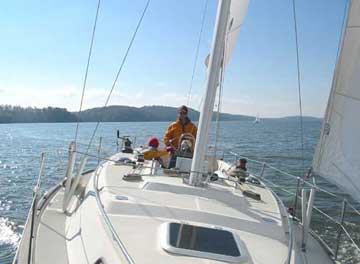
No matter how good the boat, there's always something more to be done. I thought it might be useful to compile a list of the major projects we have completed and have contemplated. Since I am new the boat with all of its systems, virtually everything is a learning experience for me.
Cleaning the Fuel System
I was well aware of the fact that many boats experience engine problems the first time they venture into rough seas when years of sediments get stirred up in the fuel tank, and had planned to clean the aluminum tank--eventually. When I failed to tighten the fuel cap sufficiently and got a bunch of water in the tank the next time it rained and failed at my attempts to suck all the water out of the relatively flat tank, I had no choice.
![]() The tank is located directly underneath the cockpit, with great access from the head via a removable panel. To remove the tank, you've got to take apart the panels on the opposite side, above the sinks in the galley, as well as the smaller panel underneath the companionway. This isn't as bad as it sounds. When you're done, you'll have complete access to three sides of the tank. I noted that the panel over the sink had some rot where spilled water had been sitting, so I took that home for some epoxy reinforcements.
The tank is located directly underneath the cockpit, with great access from the head via a removable panel. To remove the tank, you've got to take apart the panels on the opposite side, above the sinks in the galley, as well as the smaller panel underneath the companionway. This isn't as bad as it sounds. When you're done, you'll have complete access to three sides of the tank. I noted that the panel over the sink had some rot where spilled water had been sitting, so I took that home for some epoxy reinforcements.
![]() The rectangular tank is bolted down along the port and starboard edges, about seven bolts each side. The head side is easy; the galley side is a little harder because you have to get a screwdriver up from below through the engine compartment (hint--remove the drawer near the companionway first thing, rather than trying to work from underneath the sink). With all the bolts out, you just need to remove the fuel hose, the return fuel feed, and finally the short fill hose that connects to the cockpit (the easiest way to remove that short hose is to unscrew the deck fill and lift the hose off the tank). Now you can slide the tank into the head and remove it from the boat. I managed to get all of this work done pretty much on my own in about two afternoons, and took the tank to my automobile mechanic who knew a shop that specialized in cleaning fuel tanks. Although the specs say the S2 35C should have a 32 gallon tank, mine clearly stated that it was 26 gallons.
The rectangular tank is bolted down along the port and starboard edges, about seven bolts each side. The head side is easy; the galley side is a little harder because you have to get a screwdriver up from below through the engine compartment (hint--remove the drawer near the companionway first thing, rather than trying to work from underneath the sink). With all the bolts out, you just need to remove the fuel hose, the return fuel feed, and finally the short fill hose that connects to the cockpit (the easiest way to remove that short hose is to unscrew the deck fill and lift the hose off the tank). Now you can slide the tank into the head and remove it from the boat. I managed to get all of this work done pretty much on my own in about two afternoons, and took the tank to my automobile mechanic who knew a shop that specialized in cleaning fuel tanks. Although the specs say the S2 35C should have a 32 gallon tank, mine clearly stated that it was 26 gallons.
![]() Putting everything back together took most of another day, partly because the hole through the cockpit for the deck fill had been carelessly cut so that it was oblong instead of round (somebody evidently made a mistake on the first cut). I blocked up the bottom and filled the hole with epoxy, then drilled it back out. Once the tank was back in place and I had replaced both of the fuel filters, I bled the system and started the engine, content that at least for the moment, there was no water and no crud to be found.
Putting everything back together took most of another day, partly because the hole through the cockpit for the deck fill had been carelessly cut so that it was oblong instead of round (somebody evidently made a mistake on the first cut). I blocked up the bottom and filled the hole with epoxy, then drilled it back out. Once the tank was back in place and I had replaced both of the fuel filters, I bled the system and started the engine, content that at least for the moment, there was no water and no crud to be found.
New Toliet!
The previous owner, Joel, had informed us that it would probably be impossible to get parts for the Sealand marine head on the boat, and this proved to be the case. The head was leaking (fresh water, fortunately) from the pump mechanism, which finally cracked enough to be real problem. After much research I settled on a classic replacement, the Raritan PH II marine head, which I purchased from Defender. We replaced all the 1 1/2" sanitary hoses with the Sealand sanitation hose, reputed by Practical Sailor to be the most odor-free on the market. I got the new head itself installed in an afternoon, but the hardest part was getting that stiff Sealand hose onto the fittings of the holding tank. Although dockmate Lester Burk says he used a heat gun to make this an easy job, both times we've tried it we had to resort to boiling water in pot, then sticking the end of hose down in the water for a couple of minutes. This makes the hose pliable but it cools rapidly and will assume the shape you happen to have it, so you must get it on the fitting quickly.
![]() Even after all this work we were still having odor problems. The closest pumpout is six miles downstream, a three hour round trip for us. The solution has been a port-potti with a 5 gallon capacity which fits (barely) next to the Raritan. Most of the time we have this pulled out and only use the marine head when we're on trips longer than a weekend.
Even after all this work we were still having odor problems. The closest pumpout is six miles downstream, a three hour round trip for us. The solution has been a port-potti with a 5 gallon capacity which fits (barely) next to the Raritan. Most of the time we have this pulled out and only use the marine head when we're on trips longer than a weekend.
![]() We're still not done with Project Toilet because the boat currently has no Y-valve to dump directly into the sea, which is fine for the inland lakes but not really practical when we head out into the ocean. We're not looking forward to putting a big hole in the bottom of the boat, especially with a cored hull, but that is the current plan. What I'd really like, if it works as well as some say, is an Airhead composting marine head that would eliminate that big, smelly holding tank and the need for that thru-hull. I could then use the head's intake thru-hull to supply water for refridgeration, a watermaker, or a foot pump in the galley. It's possible we could fit the Raritan head and Airhead side by side (I need to measure to be sure) although the Airhead is too tall the standard teak seat. This way we could use whichever system worked the best, or hopefully later pull out the holding tank and get that extra room back. Stay tuned.
We're still not done with Project Toilet because the boat currently has no Y-valve to dump directly into the sea, which is fine for the inland lakes but not really practical when we head out into the ocean. We're not looking forward to putting a big hole in the bottom of the boat, especially with a cored hull, but that is the current plan. What I'd really like, if it works as well as some say, is an Airhead composting marine head that would eliminate that big, smelly holding tank and the need for that thru-hull. I could then use the head's intake thru-hull to supply water for refridgeration, a watermaker, or a foot pump in the galley. It's possible we could fit the Raritan head and Airhead side by side (I need to measure to be sure) although the Airhead is too tall the standard teak seat. This way we could use whichever system worked the best, or hopefully later pull out the holding tank and get that extra room back. Stay tuned.
Refrigeration
Our boat had just an icebox, so we were starting from scratch. After 18 months of buying enough ice to pay for a system, we finally installed a Adler-Barber Super-Coldmachine. Sure, I would have liked to have gotten one of those new Glacier Bay units, but that would have cost almost three times as much. Although we haven't installed the seawater cooling yet, the system seems to be working well here in Chattanooga using air cooling.
![]() I was disappointed, when I drilled through the sides for the install, to find that the icebox has only about 2 inches of insulation on the sides. This may be why our unit cycles on and off so frequently. It likes to run about one minute out ouf four, literally. I was also a little disappointed in how loud that fan (directly under the rear bed) sounds in the night. So far, considering the cost , I'm satisifed.
I was disappointed, when I drilled through the sides for the install, to find that the icebox has only about 2 inches of insulation on the sides. This may be why our unit cycles on and off so frequently. It likes to run about one minute out ouf four, literally. I was also a little disappointed in how loud that fan (directly under the rear bed) sounds in the night. So far, considering the cost , I'm satisifed.
Update: we spent well over $500 to purchase the seawater cooling kit and put a new thru-hull in so we could cool more efficiently in hot weather, but honestly I think this was money we didn't need to spend. I used the new thru-hull for the intake and used a y-adapter to tie into the drain for the aft locker for the exhaust water. In our situation, however, we rarely if ever switched on the pump to use any of this. First of all, I found the humming of the pump, right under our berth, to be a little annoying. Second, since we were cruising the Bahamas in the winter, it rarely if ever got so hot that air-cooling wasn't efficient. You have to gain enough efficienty to make up for the 1 amp that the pump consumes, and I honestly don't think we ever did. If you are routinely cruising areas where the air temperature is above 90 degrees, water cooling makes more sense.
Battery Bank
With refrigeration sucking down an average of 2-3 amps every hour, I knew that the single 80 amp/hr house battery wouldn't be enough for even one night on the hook. After much research I had concluded that four Trojan 6 volt golf cart batteries, which were around $60 each, would give us well over 400 amp/hours and fill the bill. Later, however, I began to have second thoughts about having to check and top off the water and hydrogen gas corroding the aluminum fuel tank overhead (not directly overhead, but nearby).
![]() Eventually Annie gave me permission to bite the bullet and purchase four 105 amp/hour Lifeline group 31 AGM batteries at a cost of $172 each. Total cost, with shipping, was $802 from Battery Outlet, Inc. of Chesapeake, Virginia. These are truly maintenance free, can't spill, and produce no gas.
Eventually Annie gave me permission to bite the bullet and purchase four 105 amp/hour Lifeline group 31 AGM batteries at a cost of $172 each. Total cost, with shipping, was $802 from Battery Outlet, Inc. of Chesapeake, Virginia. These are truly maintenance free, can't spill, and produce no gas.
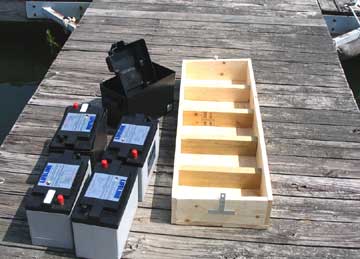
![]() I removed the existing twin-battery box from underneath the galley sink, and built a new box that would hold five Group 31 batteries all in a row, with enough room for plastic battery boxes and tops. This fit, but just barely. To get it in place, I had to cut it in half, then reassemble. I had to relocate the water-lift muffler (a saga in itself) and also the drain pipe from the cockpit/sink. To charge my new bank, I installed a Statpower Truecharge 40 with remote panel and temperature probe.
I removed the existing twin-battery box from underneath the galley sink, and built a new box that would hold five Group 31 batteries all in a row, with enough room for plastic battery boxes and tops. This fit, but just barely. To get it in place, I had to cut it in half, then reassemble. I had to relocate the water-lift muffler (a saga in itself) and also the drain pipe from the cockpit/sink. To charge my new bank, I installed a Statpower Truecharge 40 with remote panel and temperature probe.
Numbers on the Lifeline AGMs: 12.8 volts = 100% charge, 12.55 = 75%, 12.2 =50%, 11.75 = 25%, 10.5 = 0%. Bulk charge = 14.2 to 14.4v, acceptance = 14.2 to 14.4v, float = 13.2 to 13.3v.
Other Projects
I have bought several varities of LED lights for the cabin. None are bright enough for reading. Some of them I just wanted for "night lights" while at anchor away from shorepower. We also installed a Weems & Plath oil lamp on the salon bulkhead, which gives the cabin a warm glow you just can't get from LED's. I've installed at least seven 12 volt outlets in various places, and a total of six Hella fans. We purchased a Sailrite sewing machine and made our own bimini top (a must!), put new sacrificial cloth on the headsail, and have been slowly working on a dodger for the past six months.
Update: I am woefully behind on documenting my boat projects...but for the time being here is a list of what we had installed before leaving for our cruise in November of 2005:
- Sailrite Bimini Aug-03
- Salrite Dodger Dec-03
- Adler Barber Super ColdMachine w/water cooling kit Aug-03
- Isotemp 6 gallon water heater Nov-03
- Volvo Forced Air Heat Jan-04
- Groco Raw Water Strainer Sep-05
- 12 volt outlets (7) Sep-05
- Hella Fans (5 Jet, 1 Turbo) Sep-05
- 15" Sharp LCD Television (aft cabin) Jan-05
- 13" Sharp LCD Television (v berth) May-05
- Xantrex XBM Battery Monitor Feb-05
- Xantrex LLM-2 Liquid Level Monitor Dec-04
- Xantrex Propane Alarm Oct-05
- Rule High Water Bilge Alarm Oct-05
- Icom IC-M422 VHF with cockpit Command Mic Sep-05
- Icom IC-M802 HF/SSB Radio w/AT140 Tuner Sep-05
- Raymarine ST6001 Autopilot with Linear Drive Aug-05
- Raymarine C80 Chartplotter w/120 GPS antenna Oct-04
- Raymarine Pathfinder Radar Dome Nov-04
- Questas Self-Leveling Backstay Radar Mount Mar-05
- Martek Davits Aug-05
- 45 lb Delta Anchor on 100 ft 3/8" chain, 150 5/8" rode Sep-05
- 33 lb Claw Anchor on 20 ft 3/8" chain, 190 ft. 1/2" rode Jun-05
- Simpson Lawrence Manual Windlass Aug-05
- Anchor Roller, Chainstop Sep-05
- Interphase Probe Forward-looking Sonar Sep-05
- Edson Teak Cockpit Table Jan-05
- Forespar 10-18 ft. Whisker Pole Oct-05
- Katadyn 80E Watermaker Aug-05
- Seagull XF-1 Water Filter Jun-05
- Lifeline AGM Batteries (4 Group 31) Mar-04
- Xantrex TrueCharge 40 w/remote Panel Mar-04
- Balmar 80 Amp Alternator Apr-05
- BP 120 watt Solar Panels (2) w/controller Sep-05
- Rule 2000 GPH Bilge Pump w/electronic switch Jul-05
Parts I've ordered with Volvo part numbers:
- Engine mounts ("rubber elements" or "rubber cushion"), $140 each: 858455.
- Freshwater circulation pump, $770: 3812236
- Sealing rings for above (cheap, buy lots): 418411
- Hose connection for transmission cooling, about $20: 840509.
Replacing Engine Mounts
We changed out all four of our engine mounts during our cruise in an attempt to solve some of the shaft-vibration problems we were having. This was a job I was dreading, but it wasn't all that bad (aside from the cost of the new mounts).
The project started out badly. Desperate to stop the shaking (our drive shaft was hitting the stern tube at some RPM's no matter how carefully we aligned the shaft), but also not wanting to spend the money for Volvo mounts ($140 each), I purchased two engine mounts from R&D Engineering for around $90 each. We installed one (the rear port mount, the easiest to access) while at anchor in Orient, North Carolina, and indeed it did stop the shaft knock. Unfortunately, it introduced a very strong vibration or thrumming while at idle, apparently because the new mount was so much stiffer than the Volvo mounts, even though it was (I was told by R&D) properly sized for a 400lb engine. I should have installed the other mount on the starboard rear, but that one is much harder to access and things seemed fine, so we continued north with just one mount replaced.
While in Maine I noticed the thrumming at idle had suddenly disappeared. My joy was short-lived, since we had a new and more troubling vibration the instant we put the boat into gear at all RPM's. It turned out we had broken the steel plate that attached the R&D motor mount to the engine. Apparently having three loose rubber mounts and one new firm mount was a bad idea (duh!). I ordered a new attachment plate (around $30) from the Volvo parts manual, but it was quite different from what S2 had used to build the boat and wouldn't fit. In the meantime, we had the old plate welded back together and ordered a new "rubber element" (also called a "rubber cushion", Volvo part# 858455) for the old Volvo mount. Yes, I should have replaced all four rubber elements, or at least both back mounts, but again I was being stupid and cheap.
When we got back south to St. Marys, Georgia and were still having vibration problems, I bit the bullet and ordered three additional rubber elements which I managed to install in a single long evening. Here's what I know about the process:
Rear Mounts: The attachment plate--what I broke on the port side, but both sides use the same plate on our boat--is attached to the engine by three bolts. It's possible to slack the mount, let the other three take the weight of the engine, and remove the mount without otherwise supporting the engine, but I've also done this by sticking a small sissors jack under the engine to take some of the load first. To lift any real distance, you'll also have to disconnect the drive shaft from the transmission, but it's not really necessary to lift that high--you only have to take the weight off since the attachment plate can be removed horizontally when the three bolts are out.
- Lift engine with sissors jack (may not be necessary for rear mounts)
- Remove top bolt that holds the plate down onto the engine mount. Note that the rear mounts use a different diameter nut than the front; I have a 1 1/8" wrench (around 27mm?) that fits the upper bolt but is too long to work well on the lower bolt, where I use an adjustable wrench.
- Screw the lower bolt that is holding up the engine down on the mount until it is slack.
- Remove the three bolts holding the attachment plate to the engine.
- Unscrew the lag screws that hold the bottom of the engine mount to the stringer.
- Slide the entire mount assembly away from the engine and remove. Mine were glued down to the stringer, but came off easily with a moderate knock from a hammar.
- Dissassemble the engine mount (allen bolt on bottom) to remove the old rubber element, then reassemble with a new element.
- Reattach the mount.


Copyright © 2007 by Rodger Ling.
All rights reserved.
